Are you self-hosting your home services or maybe something bigger like blogs or simple websites on some VPS? How do you manage access to them from the outside? How do you limit a way into them? Below I described the way I handle that.
Let’s begin with a quick review of how we can expose services from our server.
For a better understanding in our example we are going to work with a simple HTTP service.
There are many ways, but let’s focus on these:
-
Simple expose 80/443 ports on your server, set an A DNS record that points to the IP of the host.
This is the simplest way, but the most dangerous. There is no proxy between a possible attacker and you. Anyone can find out what your server IP is and make a DoS attack. -
Run a VPN service on your server, don’t expose the HTTP port directly.
So in this scenario, you have to connect to your VPN to access your service. It’s a pretty good solution if you don’t need to expose your application to the public. Depending on the application and the number of users, this can be inconvenient. We can do better. -
Use Cloudflare as a proxy.
So in this scenario, you point all the traffic through Cloudflare. You could set your firewall to only accept connections only from their IPs and depending on the firewall (software/hardware) your server will be more or less protected. It’s harder for attackers to find out the IP of your server (but is still possible). In case of a DoS attack, the aggressor would strike not yours but Cloudflare’s infrastructure. It seems like a pretty good solution. But if you have a simple VPS or host something in your home (on Raspberry Pi or some NAS) that doesn’t have a good firewall (physical or cloud-based one, for example AWS or Google Cloud) you can rely only on software one like iptables. It means that if someone will find out your IP, you are still vulnerable to DoS attacks. -
Use Cloudflare Tunnel!
What if I tell you that you don’t need to open any of the ports of your server/router and still have services accessible from the Internet? Also, you don’t need to have static IP, you can authenticate people/devices by some rules you choose and all that for free? That’s what this article is about.
So, what cloudflared is?
cloudflared is a client for Cloudflare Tunnel. Cloudflare Tunnel is a tunnel between your server and cloudflare. Ok, but how does it work?
  ┌────────────────┐
  │     server     │
  │    ┌─────┐     │
  │    │ app │     │
  │    └──┬──┘     │
  │       │        │
  │ ┌─────▼──────┐ │
  │ │cloudflared │ │
  │ └───+──+─────┘ │
  │     +  +       │
  └─────+──+───────┘
        +  +
        +  +
        +  +
     Cloudflare
       Tunnel
        +  +
        +  +
  .- ~ ~- _+_
 /             ~ -.
|   Cloudflare      \
 \                 .'
   ~▲ . _ ___▲. -~
    │        │
    │        │
    │        │
  you     attacker
cloudflared is a daemon that proxies traffic from Cloudflare to your server - so in this scenario you don’t need to open any port on your server, so you are safe from attackers.
Ok, great! How to use it?
The instruction below shows how to use and configure cloudflared on docker with docker-compose. If you for any reason don’t want to use docker you can use normal daemon instead. Also, we are going to use msnelling/cloudflared docker image because it has multi-arch support, so it can be deployed on ARM64/ARMv7 (such as Raspberry Pi etc). Original image works only on amd64.
- Let’s create a directory for our stack.
mkdir cloudflared cd cloudflared - Now we’re going to authorize cloudflared with Cloudflare by doing this:
docker run -v ${PWD}/config:/root/.cloudflared msnelling/cloudflared cloudflared tunnel login
On output, you should get a URI to authorize with Cloudflare. Just copy and paste it to your browser and authorize the domain you selected.
You can see that your cert is stored in config/cert.pem.
- As we just authorized our daemon we can create the tunnel now.
Change
my_tunnelto a name you like. It will be the name of the tunnel.
docker run -v ${PWD}/config:/etc/cloudflared msnelling/cloudflared cloudflared tunnel create my_tunnel
The tunnel should be created. Cloudflare assigned UUID to it - you should see it in the output. Also, the file config/<UUID>.json should be created.
- Configure the tunnel
For now, we just create a simple config file to check if everything works.
Remember to replace
<UUID>with the UUID of the tunnel from the previous output
echo 'tunnel: <UUID>' > config/config.yaml
- Create docker-compose stack
Create docker-compose.yaml with the following content:
    version: '2'
    services:
        cloudflared:
        image: msnelling/cloudflared
        container_name: cloudflared
        volumes:
            - ./config:/etc/cloudflared
        command: /usr/local/bin/cloudflared tunnel --no-autoupdate run
        restart: always
        networks:
            - cloudflared
    networks:
        cloudflared:
            name: cloudflared
- Run cloudflared and check if everything works
docker-compose up -d
Check logs for errors.
docker-compose logs -f
If you see something like this, you are connected to Cloudflare and your tunnel is working:
  INF Connection 9a993abc-XXXX-XXXX-XXXX-XXXXb1f1abfe registered connIndex=0 location=XXX
  INF Connection a3d6b9bf-XXXX-XXXX-XXXX-XXXXf834c69e registered connIndex=1 location=XXX
  INF Connection 546b5613-XXXX-XXXX-XXXX-XXXXc8c44474 registered connIndex=2 location=XXX
  INF Connection fc203c0c-XXXX-XXXX-XXXX-XXXXc56e1ba4 registered connIndex=3 location=XXX
Also, you can check if your tunnel is visible on the Cloudflare Zero Trust Dashboard. Just login there to your account and go to Access > Tunnels on the sidebar on the left. You should see something like this:
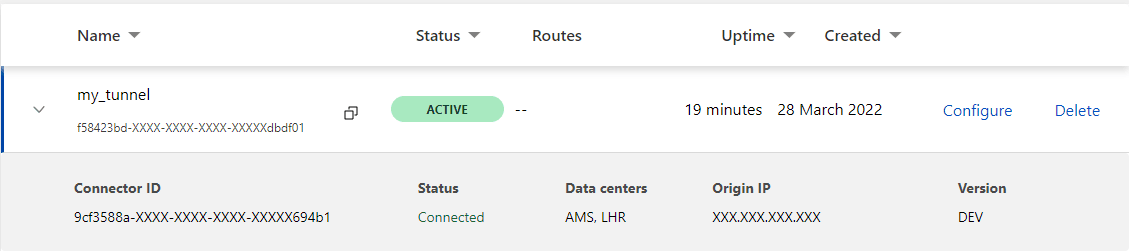
If you’re accessing Zero Trust Dashboard for the first time, you need to choose a plan to see that view. Just choose Free plan and you’re ready to go.
Great, you’ve got your tunnel configured now! Now we need to expose your services.
Exposing services
As you saw before, I have created a cloudflared docker network. The main goal is to let other docker containers join that network, so we can have them talk to each other.
If your services are not Docker-based, you would most likely want to set
network_mode: hostto cloudflared’s docker-compose.yml and access them through the host network.
- Create/configure the service we want to expose and add it to the
cloudflarednetwork.
Create a new directory with docker-compose.yaml with the following content:
Of course, you don’t need to create this exact Nginx container. The goal here is to have a container you want to expose in the same network that cloudflared.
    version: '2'
    services:
        nginx:
            image: nginx
            networks:
            - cloudflared

    networks:
        cloudflared:
            external: true
            name: cloudflared
As you can see, you don’t need to expose any ports in this service - that’s because services in docker can talk to each other freely when they are in the same network. So the most important thing here is that cloudflared can see Nginx and can connect to its ports.
Run docker-compose up -d.
- Configure ingress rules
You can imagine Ingress rules as a router for cloudflared. When a request reaches cloudflared it going to be routed just as you specify in Ingress rules. Let’s see our example.
Go to cloudflared’s config.yaml file and add at the end:
    ingress:
        - hostname: <your full domain you want your service be exposed on>
          service: http://nginx:80
        - service: http_status:404
When setting ingress rules, remember that the last rule shouldn’t have a hostname - so it can catch everything. You can return a 404 HTTP status or do some custom stuff.
Now restart cloudflared by running: docker-compose restart cloudflared.
- Change the DNS settings of your domain
Now you need to log in to Cloudflare, go to the DNS settings of the domain you have chosen in your ingress rules, and set its CNAME record to <UUID of your tunnel>.cfargotunnel.com. It should look like this:
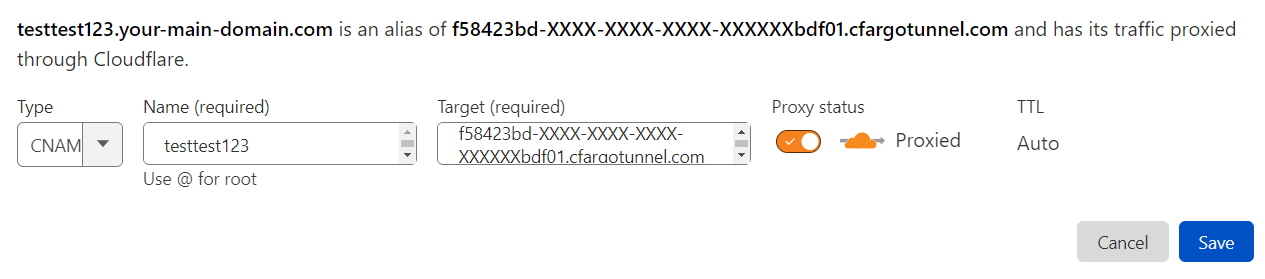
Save. Wait a few seconds for DNS to propagate and visit your domain. You should see your service or if you have used the example from this instruction you should see the Nginx welcome page:
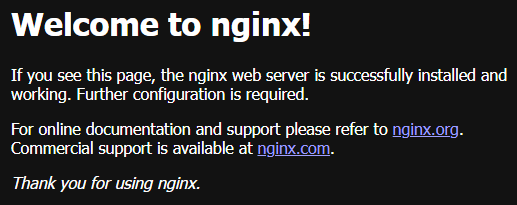
Voilà, you’ve just exposed your service!
One more thing about ingress rules. There are plenteous options you can configure, for example, you can have one domain with a lot of services by path setting, so they can be accessed like this: yourdomain.com/nginx. Also, you can redirect not just HTTP traffic but many more like SSH, RDP, or any TCP port! Read more here.
You should think twice before you tunnel your ALL services (ssh included) and block every port on your server. If anything bad will happen with Cloudflare / cloudflared / docker, you could lose access to your server.
Ok, but the title says that you can use instead of VPN, what about services you don’t want to expose publicly?
Implementing Zero Trust Network Access
If you have a private service that only you or you and your friends should access - like some file management services, home automation, or password managers - Cloudflare’s Zero Trust Network Access comes to the rescue!
ZTNA is an SSO (Single sign-on) service that controls access to your services. You can limit access to your applications by some rules like IP/Country and many more. The most powerful thing is to allow access via email/email’s subdomain (for example you can permit access to all your company’s employees) and use third-party identity providers like Google, Facebook, GitHub, Azure AD, Okta, and many more! And still, it’s free*!
* up to 50 users
In the case when you are self-hosting home services, you can just permit access to your home IP or email and log in via your favorite identity provider, and you’re ready to use your app!
Let’s configure it!
Adding application in Cloudflare Zero Trust.
-
Go to Cloudflare Zero Trust Dashboard, choose
Access→Applicationin the left sidebar, clickAdd application. Now you can choose the type of application, in our case, it will beSelf-hosted. -
On the next page fill in the name of your application, session duration, and application domain (it should be the same as you configured in ingress rules before), choose identity providers you like and click
Next. -
On the next page, you need to add policies. Do it to meet your needs, you can allow your IP, E-mail, or block some specific country, etc. Click
Next. -
For purposes of this instruction, you can leave default settings and click
Add application.
Give Cloudflare a while to process your request and visit the address you just configured - if you do not meet the requirements of your policies, you should the see Cloudflare Access page with your chosen Identity Providers, so you can log in and see your application. In case you are whitelisted you should see your service right away.
Cons
I can see a few fields that Cloudflare should think about to improve their solution. I think that policy rules could be more flexible. Whitelisting/blacklisting specific emails, IPs, countries is great but in some cases is not enough. Think about a scenario: someone is hosting a home automation/password manager service on his server (like me). He wants to whitelist his family. As a solution, he can add their e-mails or IP addresses, right? Yes, right, but think about that these services have mobile client apps that communicate via HTTP API. As devices are in the house (they have whitelisted IP) everything works well, but what about they aren’t. These mobile apps cannot authenticate by any of the Identity providers.
I think adding some new rules to policies like whitelisting via HTTP Headers (to check API key) and User Agents should be perfect, but you can’t do that now. Of course, you can create some sophisticated ingress rules to filter mobile app traffic (I did that) also you can create some long random subdomain just for a mobile app (I did that too) but these are complex solutions that could be replaced by easy rules.
Summary
Cloudflare Tunnel and Zero Trust are great options for securing your home services, small business, or even bigger web applications. In combination with docker. it provides a flexible and scalable solution to manage access to your services. And most importantly: it’s free!